Sunday, February 26, 2012

Chicken Lasagne - recipe

I've got a time coming up in about a month where I am not going to be able to do too much cooking so I have been slowing building up frozen meals in the freezer in late foil dishes. This weekend I have made a chicken potato pie for dinner and one for the freezer and a couple of large chicken lasagnes which should do us for about four meals with vegetables or salads.

The lasagne recipe comes from a great recipe book my mother in laws gave me several years ago called 'Everyday Italian'. while I have not cooked my way through it, the recipes in it all get made again and again. My very favourite tiramisu recipes comes from this book too.

This recipe has mozzarella and cream ( I used ricotta) as part of the topping. I was able to use the cheese I made the night before as part of this dish.

Lasagne Recipe

Topping
250g lasagne sheets
1/2 cup grated mozzarella
1/2 cup grated cheddar cheese
1/2 cup cream
3 tbs parmesan

Cheese sauce
60 g butter
1/3 cup flour
2 cups of milk
1 cup grated cheddar cheese

 Meat sauce
1 tbs olive oil
1 onion, finely chopped
1 clove of garlic, crushed (I always use way more garlic)
500g chicken mince (or beef mince)
2 x 400g cans of tomatoes
1/4 cup red wine
I added about a cup of chopped mushrooms
1/2 tsp of ground oregano
1/4 tsp of ground basil (I used a couple of cubes of frozen pesto)

1. Preheat oven to 180 degrees C. Brush shallow oven proof dish with melted butter or oil. Line with dry lasagne sheets, breaking them to fill any gaps and set aside.

2. To make cheese sauce, melt the butter in a pot. Add the flour and cook for 1 minute. Remove from heat and slowly add the milk stirring until smooth. Return to heat and cook while stirring over a medium heat until sauce boils. Reduce the heat and simmer for 3 minutes. Stir in grated cheese, season and set aside.

3. To make the meat sauce, heat the olive oil in large pan. Add the onion and garlic and stir over a low heat until the onion is tender. Add the mince and brown well, breaking up with a fork as it cooks. Stir in the tomatoes,  (mushrooms), wine, herbs and salt and pepper. Bring to the boil, reduce the heat and simmer for 20 minutes.

4. Spoon one-third of the meat sauce over the lasagne sheets. Top with one third of the cheese sauce. Arrange another layer of lasagne sheets over the top.

5. Continue layering, finishing with lasagne sheets. Sprinkle with combined mozzarella and cheddar cheeses. Pour the cream over the top. Sprinkle with parmesan. Bake for 35-40 minutes or until golden.

Waste not, want not...Ricotta

After making Mozarella last night I was left with a huge pot of whey (the left over produce when the curds are taken out to make cheese). I hunted around the internet for a use for this. There were all sorts of suggestions from using it in bread, smoothies or baking to pouring it on plants.
I also found a way to turn it into ricotta cheese.

It made about a cup of ricotta which I diluted an used on Lasagne as part of the topping along with the mozzarella. It certainly made the 4 litres of milk more cost effective.


Ricotta Recipe
Pour the Whey back into your pot and heat back up to from 200 degrees to boiling. The temperature here is not critical and you don't have to do it slow. Just be VERY careful not to let it boil over. It WILL make a mess. 
Some people suggest letting the Whey set out overnight. I have tried that and also started it right away and haven't noticed any difference. 
Turn the heat off and let it cool down some. After a little while, if there is stuff floating on top stir it so that it sinks to the bottom. This will help later so you can just strain most of the liquid and it won't clog up the filter so fast.


I just heated it up and then strained it over night. It worked well.

Saturday, February 25, 2012

Home Made Mozzarella - Insalata Caprese

Probably my favourite dish ever is Insalata Caprese - a simple salad of buffalo mozzarella, tomato and basil. Unfortunately given the cost of buffalo mozzarella this is not a dish I make often at home.

I have had a Mad Millies cheese making kit since visiting the food show last year but for some reason have not got around to making anything with it. Today was the day.

Making cheese is a totally new experience for me. The need to heat to different temperatures and add seemly unusual ingredients made me ultra cautious - there was none of my usual estimates and approximations! Having been through this process once I know it was be so much easier next time.

The finished product was good. While it will never be as good as cheese made with buffalo milk it was as good as if not better than the NZ made versions I have bought.
On reading more I discovered I 'stretched' it a bit too much which made it harder than I was expecting. Something to prefect next time.

We will be having Insalata Caprese tomorrow for lunch and I suspect chicken lasagne or pizza topped with mozzarella for dinner!

Preserved Tomato Pasta Sauce

I'm feeling very virtuous today. The tomatoes in my garden have gone crazy and a huge number are ripe or almost ripe.
I picked a supermarket bag full and preserved them as a chunky pasta sauce. This is roughly based on something my mother made (and still makes). The best thing about today's efforts is that I know the tomatoes have been grown with no sprays in a really healthy natural environment.

The sauce is incredibly versatile and really handy to have when you need a meal in a hurry...anything from blended as a soup to added to mince to make a quick bolognese sauce.

The sauce started with sweated onions and garlic.
The tomatoes are skinned (score a cross across the top of tomato and dip in boiling water, then plunge into ice cold water - the skin just comes away), chopped and added to onion and garlic with a little bit of sugar and salt to season.

My other reasons to feel virtuous are firstly bagging frozen cubes of pesto that I made last weekend. I use these cubes in bread, pasta sauces or just stirred through cooked pasta.
Secondly was my first attempt at making mozzarella cheese. But that's another post!

Tuesday, February 21, 2012

I love being cooked for!

Tonight's dinner was another 'Jamie Oliver Recipes' iPad app number cooked by my husband.
The tuna was marinated in ground basil and oil then quickly seared.
The spaghetti had lightly fried tomatoes with garlic and ground fennel seeds and parmesan stirred through it. The salad was basil and rocket with olives a lemon dressing.
Yum, and he even did the dishes!


Afghan Biscuits - recipe

These are so quick and easy to make and are great to use up the last of a packet of cornflakes.

Afghan Biscuits
200g Butter
85g sugar
200g flour
30 g cocoa
55g corn flakes

icing sugar, butter and cocoa for icing
walnuts to top each biscuit


Cream butter and sugar.
Add flour, cocoa and lastly cornflakes.

Use a teaspoon to measure mixture for each biscuit. Roll into balls, then flatten to the size you want.
the mixture will not spread to much during cooking.
Bake for about 15 minutes at 180 degrees C

When cold ice with chocolate icing and top with a walnut.

Sunday, February 19, 2012

Chicken Curry with Tamarind and Kaffir Lime - recipe

Still determined to add more blog posts before February finishes, I picked up one of my favourite recipes books for chicken, "World Kitchen" by Nici Wickes. this was a gift from a friend who probably doesn't realise how well she hit the mark with this gift!

I have a Kaffir Lime tree growing in a bonsai bag but don't often use the leaves in cooking. While I love Asian flavours, I have a tendency to cook more European (Italian, French...) type meals.

This recipe has a curry paste base which is really quite simple. It just looks like a lot of ingredients.

This curry is really really nice. The tamarind paste gives almost to citrus tang. We will be having this again. The picture doesn't do it any justice...needed the coriander to make it look at bit better.

I serves it with stir fried veges including thinly slices pumpkin seared and a bit browned.


Fragrant Chicken Curry with Tamarind Kaffir Lime 
by Nici Wickes
Ingredients
1 tbsp oil
500g Tegel Lean & Lite Skinless Breast Fillets, chopped
1 onion, chopped
50g palm sugar, grated
2 tbsp tamarind puree
1 cup water
4 kaffir lime leaves, finely shredded
1 tbsp soy sauce
1 400ml can coconut cream
1/2 cup roasted peanuts, finely chopped
Chopped coriander to garnish
Directions
Heat the oil in a frying pan. Add the chicken and brown over high heat until golden. Remove the chicken and set aside. Add the onion to the pan and cook over medium heat for 2 to 3 minutes. Add the curry paste and palm sugar and cook for a further minute, stirring.
Add the chicken back to the pan along with the tamarind puree, water, kaffir lime leaves, soy sauce and coconut cream. Simmer for 10 minutes or until the chicken is cooked through.
Garnish with the peanuts and coriander leaves and serve with rice and steamed bok choy.
Serves 4

Mild Curry Paste

My for processor is one of my most used kitchen tools but sometimes the urge to do things a bit more authentically and by hand. While it takes a bit longer, for me there is a sense of satisfaction that you don't get with a food processor. That and less dishes.

Today I made a mild Thai curry paste. The smell of it as is slowly grinds down is amazing...ginger, sesame oil and lime. Luckily I had all the ingredients. The green chillies came from my garden.

I'll use some it in a chicken curry tonight and the rest will keep for a few weeks in the fridge.


Mild Thai Curry Paste
a Nici Wickes recipe

5cm piece of fried ginger
2 cloves of garlic, peeled
2 green deseeded chillies
1 small onion chopped roughly
1 tbsp sesame oil
2 tbsp coriander seeds
juice of 1 lime or half a lemon
1/4 teaspoon of turmeric
1 tspn fish sauce

Saturday, February 18, 2012

Home made tomato sauce - recipe


Last year I my tomatoes didn't go so well but luckily my neighbour's did. He shared a huge bucket of them with me. I made 2 litres of tomato sauce (ketchup). We have worked out way through one and I gave the neighbours the other. Their teenage daughter loved it and theirs was gone before we had even amazed half of ours.
This year my tomatoes are going beautifully. I tried a technique on my plants I saw on a Tv programme while we were in Sydney for our holiday. They removed the majority of the branches and leaves that were not going to be fruiting. It seemed logical since that would allow the plant to put all the energy into the fruit. 
I picked about 2kgs of tomatoes today to make into a sauce (ketchup). This year I am following a recipe by Hugh Fearnley Whittingstall from River Cottage. The tomatoes are roasted with a bit of garlic and oil first, then pulped, strained and the other sauce ingredients cooked up with them.
The smell of the tomatoes roasting was amazing.
While the recipe looks a bit of mucking around, it really was pretty easy.

Home Made Tomato Sauce (Ketchup)
River Cottage recipe
Roast sieved tomatoes
Here's the basic procedure, but do vary the amounts of garlic and herbs to suit your own taste. Makes about a litre.
At least 2kg ripe, full-flavoured tomatoes - use different varieties and a mixture of sizes, all cut in half
2-3 garlic cloves, finely chopped
2 tbsp olive oil
Salt and freshly ground black pepper
A few sprigs fresh thyme and marjoram (optional, but preferable)
Preheat the oven to 180C/350F/gas mark 4. Arrange the tomato halves - tightly packed but not on top of each other - in an ovenproof dish. Mix the garlic with the oil and trickle evenly over the tomatoes. Season lightly with salt and pepper, and throw in the herbs, if using.
Roast for 45-60 minutes, until the tomatoes are soft, pulpy and slightly charred. Rub the mixture through a fine sieve, discard the skins and seeds, and that's it - your sauce is ready to use.
Roast tomato ketchup
Another one where the spice mix is yours to customise - but please don't kill off the essential tomatoeyness of it. Makes about a litre.
1 litre roast tomato sauce (see preceding recipe)
100g soft brown sugar
100ml cider vinegar
Pinch of salt
1 tbsp ground black pepper
Pinch of ground mace
Pinch of cayenne pepper
½ tsp ground allspice
½ tsp ground coriander
2 bay leaves
Put the tomato sauce into a large saucepan and add all the other ingredients. Cook over a low heat, stirring, until the sugar has dissolved. Simmer gently, stirring frequently so the mixture doesn't stick, for about 45 minutes, or until the sauce is reduced, thick and rich - it doesn't have to be as thick as bottled ketchup, though. Taste and adjust the flavour as necessary with a little more salt, sugar, cayenne pepper or vinegar. Leave to cool, then pour into sterilised bottles and seal. The ketchup will keep in the fridge for up to four weeks.

Experimental Sorbet - Feijoa and Blueberry

As promised another ice cream maker experiment.
After only making one sorbet from a recipe, but working on the theory that sorbet is pretty much just fruit and sugar syrup...with perhaps a squeeze of lime to bring out the flavour, I gave tonight's effort a try.

I took a jar of feijoas in vanilla syrup and blended it in the food processor, added frozen blueberries, a squeeze of lime and then put it all in the ice cream maker. No measurements sorry just what looked about right.
If I was doing a 'proper' sorbet I should have strained the mixture and then frozen just the juice but it seemed like such a waste. To me the beauty of feijoa is the texture.

A successful experiment and solid enough to have in a cone for Isabella's dessert.

Nostalgia Trip...Nana's Chocolate Chip Cookies


Nana's cookies on a plate from Grandma's dinner set

If you associate a food with a person (does anyone else do that?), my food association with my Nana (my father's mother) is chocolate chip cookies. When we were children my family visited every second weekend to mow lawns and generally help out. I have distinct memories of the smell of baking and especially the taste of her homemade chocolate chip cookies. 
I remember them being thicker than is currently 'fashionable' and with deep fork marks from squashing them down.


As I have said in previous posts, one of the major purposes of this blog is to record the recipes I use so that they are there for Isabella, Megan and Patrick in years to come. There are no hand written recipe books in our house.


The recipe Isabella and I made today comes from my Nana's hand written recipe book. I have changed measurements from ounces to grams and modified the cooking time a bit. I have also added more steps and instructions as the original (also below in blue) is very basic.

They tasted good but I think I overcooked them a bit. I don't remember them being browned as much as mine did today. I think the condensed milk plays a big part in their quite distinctive taste...but I'm certainly not a baking expert.


Nana's Chocolate Chip Cookies

110g butter
3 tbs sugar
2 tbs condensed milk
1/2 cup dark chocolate pieces
1 breakfast cup flour
1 tsp baking powder

Cream butter and sugar.
Add condensed milk, flour and baking powder and mix well.
Stir in chocolate chips.
Roll into balls and flatten with a fork. Make sure they are well spaced on the tray as they will spread.
Bake at about 170 for about 20 minutes (until lightly browned)


Nana's Chocolate Chip Cookies - original recipe 
110g (4 oz) butter
3 tbs sugar
2 tbs condensed milk
6 cakes of dark chocolate?
1 breakfast cup flour
1 tsp baking powder

Cold tray, press with a fork.
Bake in coolish oven for about half an hour.

Monday, February 6, 2012

A New Toy

I've wanted an ice cream maker for ages but decided that we didn't have enough space for it and that we didn't need encouragement to eat ice cream.

I managed to convince myself this weekend that the ice cream makers on sale (60% off!) were small enough to find a home AND that I could make healthier sorbets.

If I'm honest my real motivation is to make home made ice creams and sorbets for special desserts. The appeal of alcoholic ice cream also has appeal.

My first attempt was a strawberry and raspberry sorbet. It was amazing.
The recipe came from the instruction book that came with my Sunbeam Ice Cream maker. My next job is to find a recipe that has a bit less sugar in it.

I can guarantee that there will be more frozen dessert posts to come.

Sunday, February 5, 2012

Indian Sweets

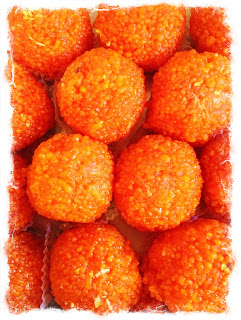
Our guests today brought with them some delicious Indian sweets called Laddu. They had had a big gathering at their home the day before which was an Indian version of what we would call a blessing for their new home. This is special occasion sweet and was one of the things they had served the 70 guests.

The Laddu come in a range of flavours. These were orange in colour but I couldn't taste orange. They have a consistency that is hard to describe. If I was to find something to compare it to I'd say it is a little bit like a ball of slightly undercooked couscous. The ball is very sweet and a bit crumbly.
I thought the little grains must be something like semolina but apparently they are made using a flour batter.

I found a clip on YouTube that shows how the Laddu are made. The little balls that make up the sweet are a deep fried batter. The tiny shapes are made by pouring the batter through a large spoon with holes in it (skimmer) into hot oil. Really interesting to watch!
The version in the video had much bigger little balls that the ones we were given...I guess it depends on the size of the holes in your spoon.

Chocolate, Banana and Berry Cake

This recipe comes from Sarah Kate Lynch's book 'On Top Of Everything.' I really like her books and especially those that have a food theme. I tried this recipe years ago when I first read the book and remembered it being really good. Today we had visitors and when I asked Isabella what kid of cake we should make for afternoon tea she said chocolate and strawberry! I'm not sure where the idea came from but it was a good one.

The recipe is for raspberries but I figure any berry will work. We used strawberries today.
The only part of the recipe I'm not sure about is the chocolate in the cake mixture. It does't say to melt it but unless it is melted it would be in chunks (...maybe I'll try that next time?). I melted it and added it with the wet ingredients.

Chocolate, Banana and Raspberry Cake Recipe

Cake Mixture
1 3/4 cup all purpose flour
100g granulated white sugar
50g light brown sugar
1 tsp of BP
1 tsp Baking soda
1/2 tsp salt
150g dark chocolate (I melted it)
3 large very ripe bananas mashed well
3 large eggs lightly beaten
120g unsalted butter - melted and cooled
1 cup raspberries

Pre heat oven to 180 degrees C. Place oven rack in middle of oven.
Butter or spray cake tin.
In large bowl combine the flour, sugars, Baking Powder, Baking Soda, salt and chocolate. Set aside.
In a medium bowl combine mashed banans, eggs and melted butter. Withe rubber spatular or wooden spoon lightly fold the wet ingredients (banana mix) into the dry ingredients until just combined and batter is thick..
Add raspberries and spoon batter into prepared tin.
Bake about 1 hour or until toothpick inserted in centre comes out clean.
Place on wire rack to cool for 5 mins then remove from tin.
Let cool and ice.

Icing
250 g dark chocolate
1 cup sour cream
2/3 tsp of vanilla.

Melt chocolate in double boiler or large metal bowl over pot of simmer water, storing occasionally.
Remove bowl from heat and whisk in sour cream and vanilla.
Cool to room temp, storing occasionally.
Icing will become thick enough to spread.
You must work quickly and spread before it becomes too thick. (If icing becomes stiff, reheat over simmering water, then cool and try again)


top with a layer for fresh raspberries.